
Last Updated on September 16, 2024 by Vincent Blaauw
 Need to Export certain information from Smart-IT directly to Excel regularly?

Please note, we only recommend using ODBC for reading data for report purposes.
Writing of data is strictly prohibited as this will cause entry mismatches and database corruption. We take no responsibility for any data loss when using the ODBC driver, either for only reading data but especially for when writing data.
ODBC is not part of the Smart-IT package and we cannot guarantee it will work as it relies on packages that are created outside of our organization.
You can with a Firebird ODBC Driver.
Today we will be looking at how to set this up correctly.
Firstly we need to download the Driver.
You need to check whether you are using the 32bit or 64bit version of Microsoft Excel first and then use the file installation.
All Files can be downloaded here
https://update.smart-it.co.za/support/ODBC_Driver_Setup.zip
This driver for Smart-IT v3 (Hybrid-Cloud) is still in Beta and not guaranteed to work 100%
Once installed, we need to set up the DSN record.
- To do this, open up the Windows Control Panel, then Administrative Tools.
- Open ODBC Data Sources (Again select appropriate Architecture).
- Click on the System DSN tab and click on the Add button.
- Select the Firebird/Interbase(r) driver and click on Finish.
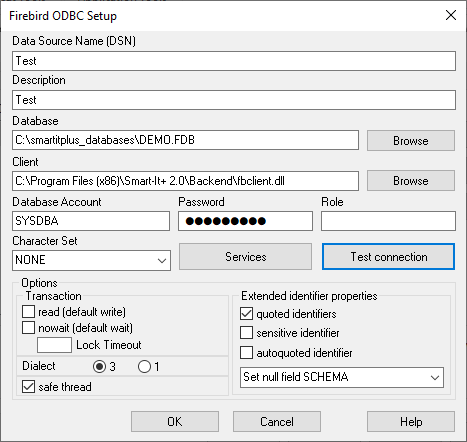
- The ODBC Setup Screen will now appear.
- Type in the desired name in the Data Source Name (DSN) Input field
- (This is the name that will appear in Excel)
- Type in the desired description in the Description Input field.
- Click on the Browse button next to the Database Input field.
- Browse to the database you want to use, select database and click on the Open button.**Note that Smart-it databases are under C:\smartitplus_databases.
- Next click on the Browse button next to the Client Field, select the fbclient.dll and click on the Open button.**Note that fbclient.dll is under C:\Program Files(x86)\Smart-It+ 2.0\Backend\fbclient.dll.
- For Smart-IT v3.0 / Hybrid Cloud the fbclient.dll can be found under C:\Program Files (x86)\Smart-It 3.0\Backend\dbserver\
- Type in the Database Account as SYSDBA in the Database Account Input Field.
- Type in the Password as MASTERKEY in the Password field.
- For Smart-IT v3.0 / Hybrid Cloud the password is unique for each Server, please contact support to obtain password. Make sure the Enable FB4+ compatibility mode is checked.
- Press the OK button.
The connection should work correctly now.
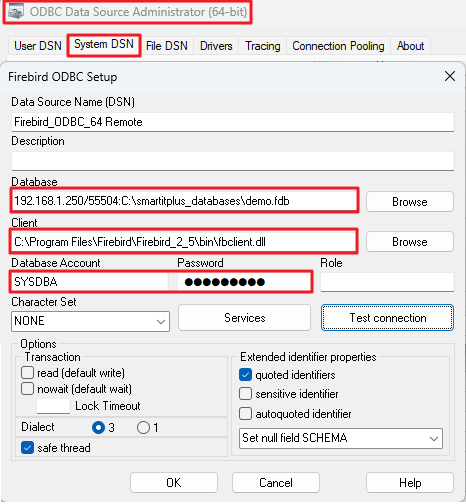
For Remote PC Connections
On the workstation that you want to establish a link from, to the server
Type in the IP Address of the server followed by a forward slash (/) with the Firebird port number (55504 – [Port Number different on Smart-IT v3.0 / Hybrid Cloud – Please call office]), followed by colon (:) and the local location on the Remote server (as it would appear locally on that server – Do not type in a network path )
On Smart-IT v3.0 / Hybrid Cloud the Client for the workstation can be found here
C:\Program Files (x86)\Smart-It 3.0\Frontend\fbclient.dll
example
192.168.0.200/55504:C:\smartitplus_databases\demo.fdb
To test in Excel
- Open up a new spreadsheet in Microsoft Excel.
- Click on the Data Tab, select the dropdown menu Get Data, go down to From Other Sources, and select From ODBC.
- The From ODBC screen will now appear.
- Select your created DSN source and press the OK button.
- All the Tables of the database will now appear.
- You can either select the desired table or tables and create a Power Query or you can insert a Firebird SQL script under the Advanced Options section in the previous step.
Unfortunately due to the nature of this driver, we cannot guarantee any support, and any changes need will not be covered by your Smart-IT contract.